My Weird Lighting Pattern
By Michel Gilbert & Danielle Alary
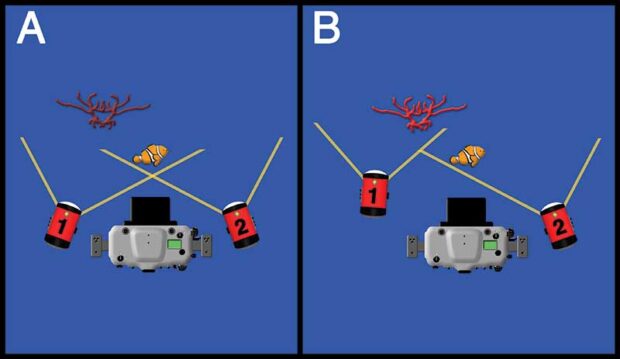
Light is the foundation of any image and artificial lighting is ubiquitous in underwater photography. When using twin strobes, you can go beyond the standard strobe head placement.
As we’ve said many times in this column, adding a second strobe is probably the single most valuable improvement you can make to your underwater photography. However, twin strobes need a little getting used to.
In 2000 while on assignment in Fiji, Danielle tried my rig. Used to shooting with a single strobe, she went through a couple of rolls (digital had not yet transformed the photography world) and life went on.
Upon returning home we sent the film processed and, one day, sitting in my office I answered a frantic call. Danielle was crying at the other end of the line (yes there were physical lines at the time). I asked her what happened: has all the film being lost, did they destroy our work during processing? She then gave me a reply I’ll never forget: “I can’t believe I made such beautiful images!” She had discovered the magic of twin strobe photography! The other difference came from the fact that I had given her two large Ikelite DS-200 strobes, a huge departure from her tiny DS-50s, both in terms of bulkiness and light quality.
This marked the beginning of her love affair with twin strobes.
Another step
To make life simple I told Danielle to put her strobes at the ‘standard’ 9 and 3 o’clock positions. A safe bet and a good starting point.
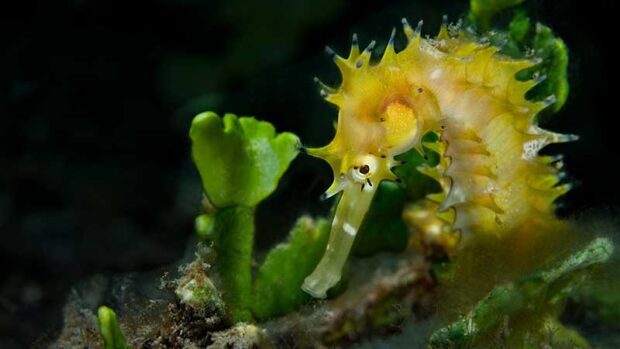
That was great for a certain amount of time but eventually she noticed that, especially in her macro and fish portrait work, although her main subject basked in fine light, the background tended to be a bit dark.
It meant she was ready to use what I call my ‘weird’ lighting pattern. I explained it as follows. [Note: This is mostly applicable to fish portraits and macro images.]
I often begin by taking the ‘safety’ shot, i.e. an image that I can use to show my mother-in-law that I saw the fish. For such photographs I rely on standard strobe placement and composition. Once I have a satisfactory picture in the bag, I begin the journey toward more creative images. One big caveat: this approach works when you can spend time with a subject. If this is not possible then you must aim for the final lighting/composition from the get-go.
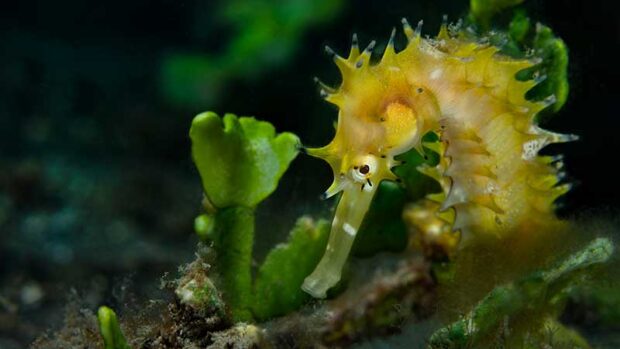
When the background is not well exposed using the ‘standard’ strobe position I proceed with my weird thing: I study my ‘safety’ shot, checking the image on the camera’s LCD screen. If the background is underexposed I reposition one strobe, usually the left one.
To do this I extend the strobe head position forward, making sure the light cone covers the background. I am also careful not to light the area between the port and the subject, to avoid causing backscatter. I then make a test exposure. With skittish subjects I perform this exercise on a rock or on another subject before moving back to my original position.
You could also use a ‘proxy’ target before moving in on the real subject. Doing so allows you to begin making a final image as soon as you assume your definitive position.
Sometimes I lower the left strobe power level if I think it may be too close or I place it at a compatible distance with the targeted exposure (f/stop). With experience it becomes second nature and the operation requires just a few seconds.
I check the balance between the background and the subject/foreground exposure to determine if it meets my expectations and repeat.
Sometimes I need to further adjust strobe power and/or position and take more test shots. I may also move the left strobe around to see if this produces a more pleasing image.
Play around with it
Never hesitate to experiment, keeping an open mind. Try to think like a kid. As adults we often limit ourselves and this may hamper our creative process. Kids have no barriers or pre-conceived notions; they act in a more instinctive manner with surprising results.
In some cases, I rely on available light in the background as well. In such a case, since strobe exposure is determined by aperture, I play with the shutter speed to ensure that natural light will properly illuminate the background.
Of course, strobe-subject distance as well as strobe power level also affect exposure, but we need to keep things simple. As for shutter speed, I make sure not to exceed the maximum sync speed of the camera or go to slow and induce motion blur. If necessary, I play with ISO setting to either lower or increase shutter speed, making sure that I keep other parameters in line with proper exposure.
After reaching the desired balance I concentrate on composition and/or behaviour and forget about exposure for a while.
Tip: If you have a twin strobe setup and only want to use a single one, instead of turning the second strobe off, simply aim it up and toward your back. Once you are done, resume its normal placement. Doing so will help you avoid the dreadful mistake we all make, i.e. forgetting to turn on the second strobe in time to make the picture of a lifetime.
As with many other skills, experience makes a huge difference. Pool practice also comes in handy as this is an exercise that you can easily perform without going into the ocean.
If you decide to jump in a pool, use different subjects and/or backgrounds, keeping in mind the effect of colours and reflectance on your images. Aim for something that mimics the real-world conditions you will encounter in open water.
Happy bubbles.

