Colour Corrections and Grading
Words by Jill Heinerth

We’ve all seen an underwater video with a distracting blue cast. Our eyes long for the warm tones of orange and red that we saw on the rope sponges during our dive. What happened? Can we recover what we remembered from the hazy blue footage? If you are struggling to recover the reef’s glorious colours, you will need to work on two skills: colour-correction and grading. Colour correction refers to adjusting white and black levels, exposure, contrast, and white balance to net a sequence with accurate, natural-looking colours. Once colour corrected, your video will be visually consistent from scene to scene, offering a more pleasing overall flow. At this point in your edit, you are not trying to apply a style. Your goal is to make colours appear natural and balanced in the overall footage.
The ‘styling’ part of the process occurs when you move on to colour grading. Grading applied at the end of an editing process gives a distinct ‘look’ to your footage.
Using a histogram to determine an ideal exposure offers latitude for later corrections. White balance or colour temperature works the same way in your camera as it does in edit or colouring programs. Good lighting and a proper white balance underwater is the best way to start, but you will still need a few more adjustments in the edit.
Assemble Your Rough Draft
Assemble your entire timeline before worrying about the colour cast and exposure of your footage. It can be tempting to correct each shot as you edit, but an overall approach will net superior results. Your footage needs to look balanced when compared to the shots before and after.
Exposure Corrections
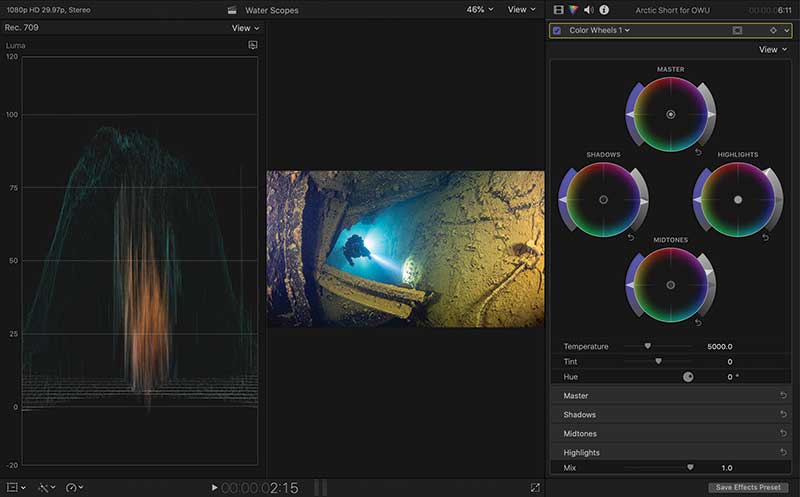
Some editing programs offer automatic exposure corrections, but an auto-correction might yield footage with a weird colour cast. A manual approach is preferable. I like to open up the ‘Video Scopes’ in my Viewer. Scopes (Waveform, Parade, Histogram, Vectorscope) are a monitoring tool that shows colour and light information on a graph to see the precise balance of these characteristics and how they compare to one another.
Test the auto white balance, then use the eye-dropper tool to select a part of the shot that should be white. I like to use colour wheels (also known as three-way colour correctors) for adjustment beyond that. Start with the master exposure wheel and watch the video scopes to ensure that you have elements that range from entirely black to fully white. If the scope reveals over- or underexposure, use the master wheel to fix the shot between 0 and 100.
Mid-tone Corrections
Once you know that your footage is neither over nor underexposed, you can play with the mid-tones exposure level. Most of the time, you will need to open up the mid-tones to reveal details in your footage’s darker regions. Stay away from shifting saturation or colour balance in this stage. It is essential to do this process in the right order for the best results.
Examine the Hue
Hue is a term that describes the colour itself. Your underwater footage will always have a blue or green cast. The hue should shine through for authenticity, but too much blue is like diving at 100 feet (30m) without a light. When you recognize that your footage has a colour cast, you can correct it. When a skin tone is ‘off’ in a photo, we see it immediately. The same is true for underwater footage. Hue corrections are necessary to create a sequence that looks natural.
Correct the Hue
The colour cast of your video may differ from highlights to mid-tones to shadows. Each of these can be tweaked in the colour wheel colour corrections. You can also shift the hue using the master colour wheel. If there is too much blue, move the target in the opposite direction to erase blue. If it is too green, shift toward the opposite side, or magenta (pink) tones to bring the sequence back to a healthy colour balance.

Review Colour Saturation
Saturation describes the intensity of the colour or how much grey is present in vivid colours. Saturation can make your video pop, but if it is over-applied, it might look artificial or more like a comic book. In many colour wheels, you will have an exposure slider on one side and a saturation slider opposite.
Once an individual clip is fixed, you can apply the same corrections to other clips in the sequence. You can identify a master clip that acts as a source for colour correction information. Check each clip after applying effects to ensure you have the results you were intending.
Secondary Colour Correction
Your overall sequence may appear balanced, but sometimes a particular part of the image might need more finesse. A red rope sponge might demand a second look just as a stop sign would if you were filming topside. Everyone knows the colour of a stop sign. If the colour is off, people will notice. The same is true for some underwater inhabitants. If a whale shark looks purple-ish, you may need to work on that sequence.
Colour Grading
Now you can transform from a videographer into an artist. Colour grading is the step where you apply a creative style or look. We’ve all seen movies with heavy colour grading. Smoky, dark grading can make a sci-fi film look ominous. Desaturating your shots can make them look vintage or historic. Monochrome grading can be used to show off shipwrecks or match archival footage. The process is additive, meaning a colour cast is dropped on top of the corrections you did already. Don’t do this in the wrong order, or you will make a mess out of your work.
You can use pre-determined filters in your editing program or apply LUTs (lookup tables) that provide a specific style. If you create a custom colour grade that looks great, you can export it as a LUT, and apply it to the rest of your scene. You can also find LUTs online and use those parameters to affect your footage.
Colour corrections and grading take time and practice. If you start with the best possible imagery, you will have the easiest time achieving your creative goals. White balance and proper lighting in the original footage are critical.
Once you’ve mastered colour corrections and grading, you’ll want to revisit some of your old edits and bring them new life. An interesting grade and some good music can transform your old shots of whale sharks into a delicate ballet of water and light.
Leave a Comment

