Simple Fix with Vivid-Pix
By Michel Gilbert & Danielle Alary
Tired of making all those adjustments to restore underwater photo contrasts and colours? If so, you’ll be interested in some new software that we tested recently. No one needs to spend more time in front of a computer screen these days and for those who’ve experimented with Photoshop or other photo retouching software, the meaning of frustration is well known. This was surely in mind when Rick Voight and partner Randy Fredlund imagined Vivid-Pix Picture-Fix software.
We met Rick in another century/millennium, when images were made on film. The under 20 crowd today will never know the smell of a roll of 35mm film, with its distinctive, even pleasing, chemical scent. In those days it was the lab technician who adjusted your images, providing you weren’t shooting the dreaded ‘make or break’ slide film.
Enter the Digital Era
Digital turned our beloved 36-exposure film tools into museum pieces seemingly overnight. Underwater photography quickly became more affordable than ever, and simple cameras produced results that were ‘front page’ quality by 1970s standards.
As useful as digital may be, it cannot change the laws of physics. In terms of underwater photography this means lack of contrast, loss of colour and reduced sharpness are ever present. Using a compact camera without an external strobe usually results in dull colours and flat images.
Books, videos, seminars and workshops can transform you into a post-production ninja – if you’re willing to devote time, money and brain power to learn the skills. For those who prefer the fast track, Vivid-Pix may be the Holy Grail.
A Simple Life
The hardest part of learning how to use the software is actually the registration process, a two-step procedure that takes about five to ten minutes.
Vivid-Pix website provides short how-to videos that teach you the basics while you sip a cup of coffee. This is all you need to become a certified Vivid-Pix user!
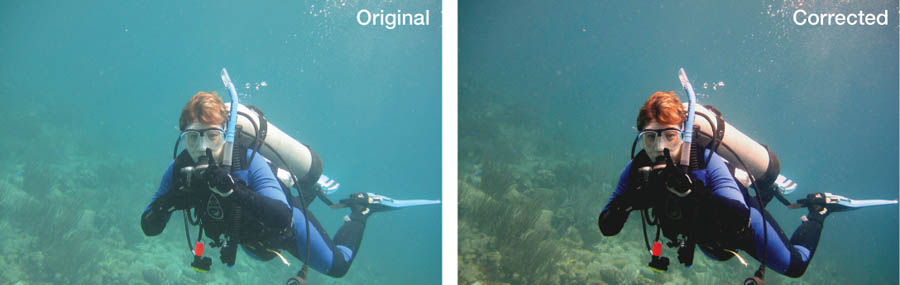
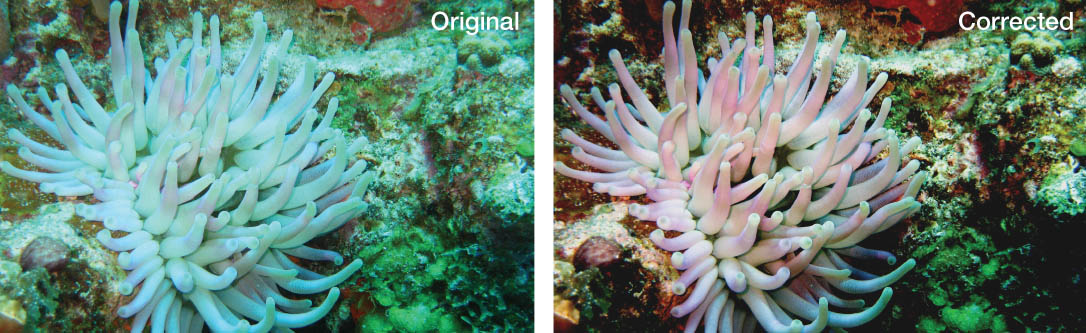
The post processing begins with image file selection. With this accomplished, Vivid-Pix™ presents nine different correction choices or options. You pick one, click on the preferred rendition and two versions of the photograph appear on the screen along with six horizontal sliders.
The original JPEG (sorry, no RAW support) is presented at the left of the preferred adjusted version. The sliders (respectively called: Depth removal, Lightness, Contrast, Cyan/red color balance, Magenta/green color balance and Yellow/blue color balance) show the respective correction level applied to the image. A seventh slider adjusts the saturation, termed ‘vividness’ here.
If the selected auto-adjustments meet your requirements, hit the ‘Save Vivid-Pix’ button and a corrected version of your original photo is saved with the word ‘vivid’ in the file name. You never lose your original file; kudos to Vivid-Pix for that simple idea.
If the selected adjustments are not exactly to your liking, simply play with the sliders until the appropriate correction appears on the screen.
In our test we corrected seven images in about five minutes, purposely using the sliders on each picture. You can hardly match that speed in Photoshop, even with experience.
The latest version of the software also incorporates a fast crop tool that comes in handy. Once the image is processed, simply left click and hold while moving the cursor. The cropped area appears with dotted lines around it. Once satisfied, simply let go and the cropped image is ready to be saved.
Perfect… Almost
Most people make casual images with simple cameras, usually without a separate strobe. For these users, Vivid-Pix brings an easy and fast way to post-process photographs.
Of course, the software has its limitations. It’s not meant to replace complex retouching. Rather, it restores colors, brightness and contrast to render images efficiently and with a pleasing end result.
Unfortunately, Vivid-Pix cannot alter those laws of physics mentioned earlier. If you shoot an image at 80 feet (25m) and expect the colours to be perfect, you’re going to be disappointed. Red will have been absorbed and although you can select an adjustment with more red in it, the bluewater background may exhibit a magenta bias. In a case like this be careful not to over compensate.
We tested images that were perfectly exposed and lighted with a strobe. The software made suggestions that could have improved them based on the user’s preferences.
And these settings can also be saved to process similar images in the future. However, batch processing is not implemented yet.
Adding an ‘undo’ button could also come in handy for image rotation.
In Closing
Vivid-Pix is sold through retailers and online. At $49.99 it’s a deal. It runs on Windows and on Macs and should help speed up post-processing for the beginner and experienced photographer alike.
Using Vivid-Pix Picture-Fix is like cooking Minute Rice: it’s easy, it’s fast and it’s effective. You’ll still need an image-processing tool for advanced functions, if you have the time and patience, which are increasingly rare in our fast times.
Go to www.vivid-pix.com to download a free trial version!
Leave a Comment