
How Photogrammetry Works
Words by Ken Merryman
Strictly speaking, the term photogrammetry is the science of making measurements from photographs. It means one can determine the true size of an object in a photo from the size of the object on the camera sensor knowing the camera lens and distance from the camera. Using that algorithm as the basis and a significant number of other techniques, together called Structure from Motion, technology companies have created software that allows one to build a 3D digital model of any structure. One only needs to shoot photographs of the object at multiple angles all around the subject. The actual model generation is typically done in five steps, and in truth, each step takes advantage of its own algorithms.
The first step is photo alignment. The software recognizes certain points called key points in each photograph. When there is sufficient overlap between photographs, the software can find the same key points in multiple photographs and essentially link one photo to the next. Using the photogrammetry magic, it assigns a position and angle to the subject in space that each image was taken. Points that exist in multiple photographs, called tie points, are recorded, and form a sparse point cloud which gives a rough model or form of the object. In the next step the point cloud can then be “densified” to create a more dense and more exact point cloud called a dense point cloud. In the “create mesh” step points in the dense point cloud are connected to create interconnected triangles giving the cloud a faceted surface. Since the triangles are small relative to the surface of the model, the model appears to have a smooth surface. To get the appearance of higher resolution each triangle is then colored or “textured” by using a snippet from the original photograph that projects on to the triangle surface. Once textured we end up with a detailed model of the object, which in our case is a shipwreck.
All of this sounds complicated, but the steps have been combined into a reasonable process to take you from photos to models in minutes to days. The processing time depends on the size and complexity of the subject, the quality of the images, and the power of the processing computer. Once generated the models can be uploaded to websites like Sketchfab where they can be viewed, tumbled, rotated, or zoomed using a normal web browser. These models can then be embedded into other websites where they will have the same look and feel as the Sketchfab model. Labels and special viewpoints can be defined for interpretation and even transparent or see-through walls can be defined for easier viewing of internal spaces. Companion website apps have also been developed to complement the models by adding story or history panels.
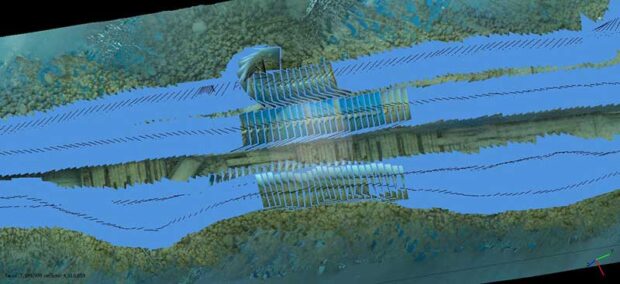
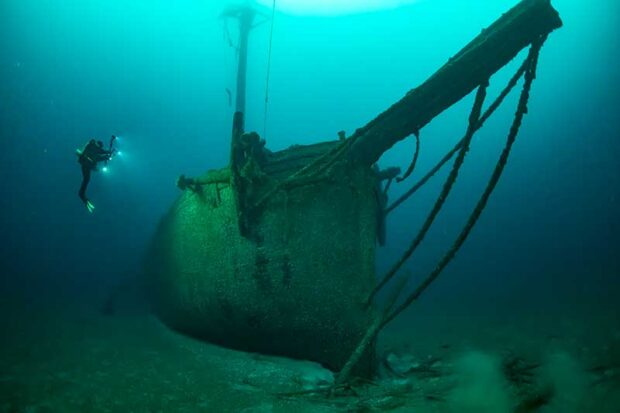
The first step is the photo alignment. Each blue rectangle represents a separate image that will be used to create the model. You are viewing most of the rectangles from the edge. This is a portion of the bottom of the wreck Fletcher, one of the many filleted out shipwrecks in Lake Michigan.
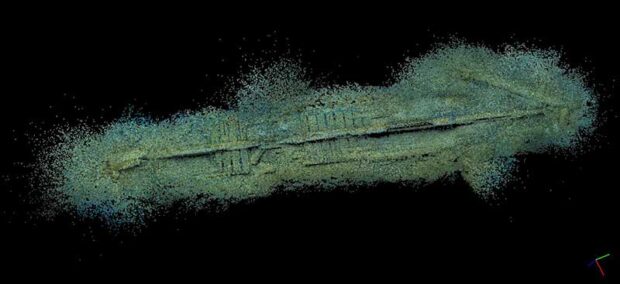
Once the photos are aligned and positioned in space, points common to three or more images are recorded and create a sparse point cloud like this one of the shipwreck Fletcher.
The sparse point cloud can then be “densified” to create more points called a dense point cloud. The dense point cloud shows more detail and should accurately represent the original structure.
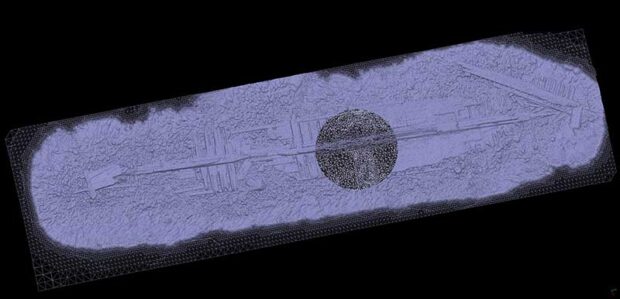
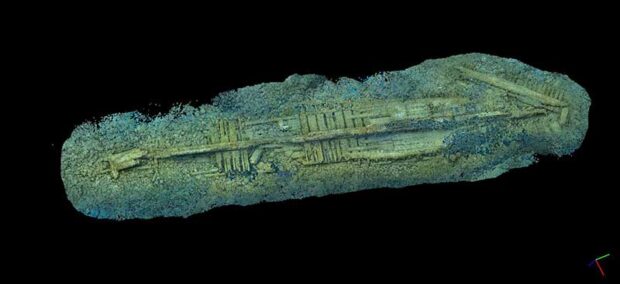
The points are then connected to create millions of small triangles that give the model a surface called a mesh or wireframe. This is the mesh of the Fletcher. The circular dark area is a magnification of an area below it showing the mesh triangular faces.
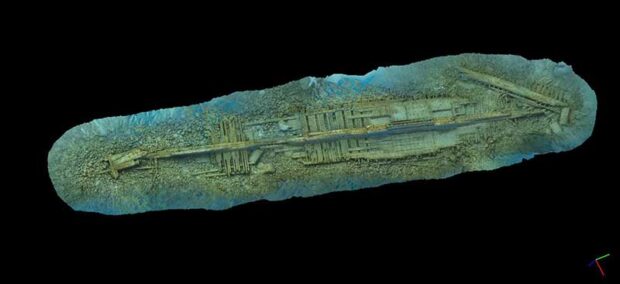
Each small triangle is then colored or textured using a small snippet of the original image that was used to create the triangle. The model now looks like the original subject.
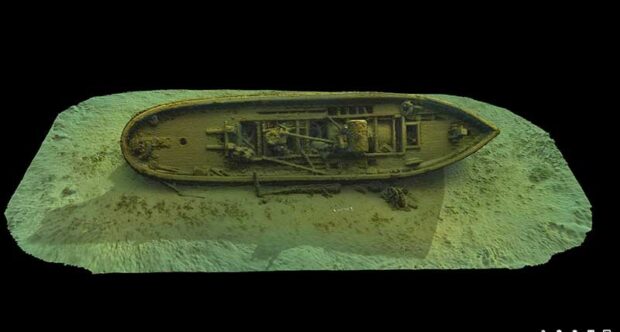
The final product is a three-dimensional model that can be rotated and viewed from any angle. Of course, if you didn’t photograph the shipwreck from a direction or if a detail was obscured in the original photos, it will also be absent in the model. This is a screen capture of the model of the historic tug Sport from Lake Huron, which can be viewed in 3D on www.3dshipwrecks.org
3 Responses to “How Photogrammetry Works”
Leave a Comment


Timothy Morrison
This is stunning work. Congratulations and thank you for undertaking this valuable work. 8 or 9 years ago, we performed photogrammetry (via a subcontractor) with what was then state-of-the-art laser photogrammetry to make final adjustments and preparations to a huge steam generator (boiler) for a nuclear plant in the US. I can’t believe how much more advanced the technology has become in these last few years.
Now, I know next to nothing about 3D printing, but is it possible to make a physical 3D printed model from some of your files, realizing that there are some gaps in the image on some?
Thanks again for letting us non-divers experience these wrecks in some way.
Sudarshan Ranpise
Really worth to read and understand the advances of technology in Photogrammetry, next to nothing about 3D printing, but is it possible to make a physical 3D printed model from some of your files.
I am Interested in more learning,this course will be really benefited for me.
Ken Merryman
Yes, any of the models can be 3D printed. We are working with a couple of museums to print models for their displays. The models in Sketchfab are downloadable in .obj format and typically you would need to convert it to .stl format for printing but that is easily done.